
Do you want to transform your home workspace from drab to fab? Whether being a virtual assistant is your main gig or a side hustle, having a functional space is important. Read on, I’m sharing how I transformed my workspace without breaking the bank.
Let’s connect on Instagram! I’m @melyssamunday and @mamasmakingmore.
Blog
Hey there you amazing work-from-home mama! With a bustling household and a business to manage, finding a dedicated workspace is crucial. It’s the place where you’ll focus on your work, unleash your creativity, and maintain a sense of order amid the chaos.
When it comes to creating your workspace, it helps to think creatively. Do you have a room or corner that’s not being put to good use? Transforming an underutilized area into a functional workspace is a budget-friendly way to create a haven of productivity. Be sure to look beyond traditional office spaces and reimagine your home’s layout.
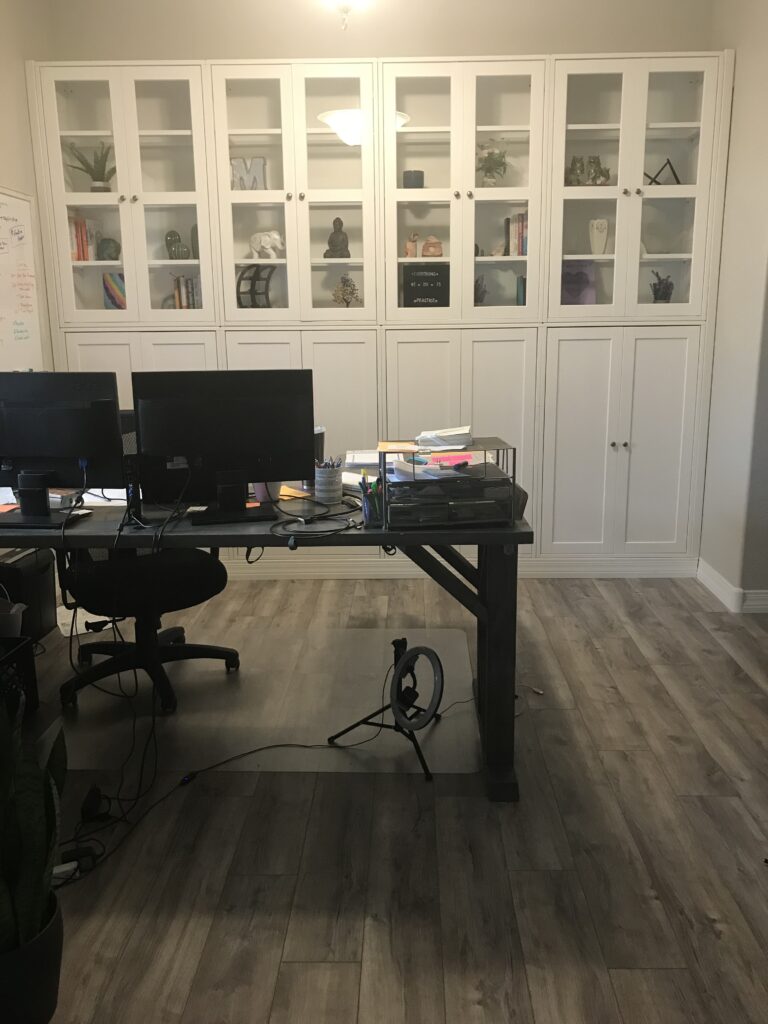
Creating a built-in look on a budget is totally possible, thanks to this little hack I discovered on Pinterest. Pre-made cabinets can be your secret weapon. I discovered Havsta cabinets from Ikea. I liked the look and the measurements worked out well in my space. You can search for inspiration online – platforms like Pinterest and Instagram Reels are great places to find lots of inspiration and ideas. Consider cabinets that not only fit your space but are functional. You can decide if you want cabinets with solid or glass doors or even open shelving. You can also determine if you want cabinets to take up only a portion of a wall or to be floor-to-ceiling.
Want to learn more about starting your VA Business? Grab my Quickstart Guide to Build Your VA Business now!
After you’ve found and purchased your perfect cabinets, get ready to assemble them. Spoiler alert, assembly is not. my jam so I got my husband to do that hard work. Once they are all put together, you can personalize them further by adding unique touches like decorative knobs or a fresh coat of paint. This is your chance to infuse your personality into your workspace.
Next, you can add some jazz! Whether you’re a minimalist or a lover of decor add plants, artwork, or trinkets that bring you joy and inspiration. Organize your supplies as well. The goal is to create an environment where you feel motivated and ready to tackle any task that comes your way.
For my workspace, I wanted to have some cabinets with a solid door to hide away supplies, and some with glass to jazz it up with decorations.
Do you like the finished results? I love it!
Ikea did not have the exact set I wanted so I needed to improvise and get some that were taller than I had planned. It ended up working out great. In order to slightly elevate them, my hubs built a pedestal to place them on. They were also a few inches away from the wall, so we used some baseboards and molding to fill in the gaps and complete the built-in look.
By thinking outside the box and adding a touch of personal flair, you can create a functional, budget-friendly, and inspiring workspace that fuels your productivity and brings you joy. Happy designing!
Are we Insta friends?! I LOVE connecting there, voice DMs are super fun! I’m @melyssamunday and @mamasmakingmore.
Episode Transcript
[00:00:00] Melyssa: Hi, mama. How the heck are you? I am coming to you. If you’re listening as I publish these, I’m going to start publishing episodes biweekly to give myself a little bit of grace. I feel a little bit overextended right now.
[00:00:15] Melyssa: I have my business. And in addition to that, I’ve got my five kiddos. And we’re back in school right now. I’ve just started to get a little bit more involved, when we moved to this state and this community, it was right before COVID hit. So I haven’t really got, , super entrenched in our community. And now I have kind of been putting myself out there a little bit more, volunteering for some more things, sometimes accidentally volunteering for some things.
[00:00:44] Melyssa: But I am getting a little bit more involved in my kids’ schools and sport activities in that is taking away a little bit of time from my business and life. And so I think publishing bi-weekly is just going to fit in a little bit better with life right now. I don’t know if any [00:01:00] of you can relate. I help out with our local recreational soccer. I do their social media. I’ve done that for a couple of years now.
[00:01:08] Melyssa: I am also getting involved a little bit more with our high school. My oldest is a junior and then all the rest of my kids are they’re going to be coming starting next year. I am newly this year on the PTA and helping with their social media. Help with what you know. And, also, my oldest is a runner, he does cross country and track. They often don’t get a lot of the glory that some of the other sports do. So I’m helping them build a boosters and doing fundraising for them. This is a whole new thing that’s a little bit out of my comfort level, but I am kind of excited, my son’s excited to help me with it, and it’s a little bonding experience for us to start, growing this program and getting them some money.
[00:01:47] Melyssa: So with all of those things, if you are one of those moms that kind of feels overextended at times, I feel you, right there with you. But I will be coming here publishing every other week until I [00:02:00] change my mind because, sometimes we do that.
[00:02:02] Melyssa: Last episode, I talked about how to, not work from your bed, how to find a dedicated workspace, how to get creative and find an area in your home to create that dedicated workspace. And the reasons why you shouldn’t be really working from bed. If you haven’t listened to that episode, it was episode 15, so hop on back to that one.
[00:02:24] Melyssa: Then today’s episode, I want to kind of piggyback on that a little a bit and talk to you about how I had my workspace personalize a little bit for me, how I did it on a budget and help you get those creative juices flowing and get some ideas for your own workspace in your own home.
[00:02:42] Melyssa: First of all, I think we all feel like we need more space. I don’t know if we ever feel like we have quite enough space. And in this home that we live in, one of the craziest things we don’t have a ton of storage space. We have the closets in our bedrooms. We have one really [00:03:00] small coat closet.
[00:03:01] Melyssa: And really just no other, no other storage. And I came from a home that had a couple other storage areas, like a closet that I was able to put a lot of the kids, art supplies in and stuff like that. So when it came to this home and setting up my workspace, my office space, I knew that I was going to need to get creative and figure out some way to have some more storage in there.
[00:03:24] Melyssa: I talked about this a little bit. In the last episode, in our current home, we really liked this model for a few reasons. One of the reasons was there was a dining area. And I knew we would not use it for a dining area and that instead I could convert it into my workspace.
[00:03:40] Melyssa: Pretty quickly after moving in, we hired someone to fill in one of the archways, cause it was really open on two sides. I had walls on two sides and then there was these two giant archways on, the other two sides and I wanted it to feel a little bit more enclosed.
[00:03:56] Melyssa: Now there’s one wall that has a window that faces the [00:04:00] front, which I love that natural light. And then also I get to kind of spy on my neighborhood see the flowers and birds and butterflies out front. Then that left me the other wall for storage space.
[00:04:11] Melyssa: I decided that I really liked the look of built-ins, but not the price tag. So what I did was I got a little creative, I of course got on Pinterest and actually reels. I, for some reason was getting sucked into the algorithm of reels that would show renovations of office spaces and other things. By doing those two things, I realized that we could purchase some cabinets and then make them look built in after we constructed them and all of those sort of things.
[00:04:43] Melyssa: I guess this is a little bit of a hack, not my own hack, but something that I found by researching online is to look for cabinets that you can install and have them look like they are built-ins. When you’re looking for inspiration, obviously go on Pinterest, go on reels. Tik-Tok, [00:05:00] YouTube, whatever it is that is your jam. And just start saving some videos, start writing some notes of what it is that you like.
[00:05:07] Melyssa: Some things to consider are, do you want the cabinets to be all the same style and the same function, or do you want to mix and match? Some cabinets are completely wood and the doors are wood and you can’t see inside. Some cabinets have glass doors. Some are just simply, bookshelf type of cabinets. There’s different options, so you need to figure out,, what do you want? Do you want to stack some things? Do you just want a lower row of things and then be able to like, have a little bit of a workspace on top of them?
[00:05:39] Melyssa: What I did was, I wanted to have a little bit of function and a little bit of decoration in my office. So, what I went with is I found some cabinets at Ikea and the exact cabinets that I have. They’re called the Havsta cabinets. It’s spelled H A V S T aA I could be [00:06:00] completely destroying that name.
[00:06:01] Melyssa: This is not a sponsored podcast either. I do just, you know, like Ikea for their variety. I found that specific type of cabinet. And they fortunately had a few different options. They did have the complete wood cabinets. They had a couple of different Heights. And I think all the widths were the same, but I think the Heights were a little bit different and they also had some that had glass doors on the front. They also had some that were a little bit more bookshelf-y looking, they’re a little bit more open. The first step, when you’re going to do something like this is to measure your space. I knew that those cabinets that Havsta cabinets from Ikea, I knew that there were almost the right size. They were almost the right length to get me from both sides of the wall to fit in completely like a built-in. But I knew that there was going to be a little bit of gaps and I had an idea, based on what I saw on Pinterest about how we were going to deal with that down the line.
[00:06:57] Melyssa: Again, I decided that I needed function [00:07:00] was the most important part. I really wanted an area where I could close the doors and just kind of have my supplies behind that and not look messy. And then a little bit out of my comfort zone because I’m not a knickknack type of person, but the top, ended up being the ones that had the glass door.
[00:07:17] Melyssa: What I ended up going with wasn’t exactly what I had originally envisioned. I had to be a little bit flexible based on what Ikea did have available, but we made it work.
[00:07:26] Melyssa: Now, Ikea is just one option. You could go through a local hardware store , home Depot, home type of store that has cabinets anywhere that would have, , cabinets that you could purchase and assemble yourself.
[00:07:39] Melyssa: Once you have that basic design down, the next step is to figure out what other supplies and what other things you’re going to need. Fortunately for me, I have a super handy husband who, came with a saw and all kinds of tools and the things that were necessary for us to put these cabinets together and to install them. Some other things to think about. Do you need like a saw, do you have to [00:08:00] cut things down? Do you need the tools to assemble? Do you need some extra wood? Mine did not go wall to wall completely. So we needed to install some molding around it to make it work.
[00:08:12] Melyssa: After you’ve got your supply list down. You’re ready to go ahead and get all of your supplies. Now, if you’re going to go to somewhere like Ikea, where they have boxes and boxes of your cabinets. Make sure you bring a vehicle that’s big enough. A little side story for you. I went with my mom because we do not have an Ikea in our town or really near our town.
[00:08:35] Melyssa: The nearest Ikea is two hours away and I live in Northern Arizona. The weather’s really decent. I love it up here. But down in the valley where I had to go get the cabinets, it was a day where it was like 115, it was so hot out. My poor mom was such a trooper. We use my mom’s truck because I knew that we were not gonna be able to fit the cabinets in my vehicle. That’s another thing is to make sure that if you’re going to be transporting them, make sure you definitely have enough [00:09:00] space. It was actually a fun bonding experience for my mom and I to travel down there and to go load up with all these boxes. It was quite the adventure, loading up massive amounts, if you’ve been to Ikea again, they don’t have everything all in one box. So you have to get multiple boxes of things. And then we were outside in that heat. Jigsawing everything back together to fit, in the truck and inside the truck. And we were jam packed in that truck.
[00:09:25] Melyssa: I got a white cabinet set and I have gray walls. I decided that I wanted to leave them white. But another thing to consider is if you’re going to be painting them, that’s another supply to add onto there. Next you’re going to get your area cleaned out. If you already have your workspace set up in there, you may have to move it away, make sure that the area’s all clean.
[00:09:44] Melyssa: What we did is we didn’t want the cabinets to sit directly on the floor. So my husband constructed a little bit of a pedestal, so that then the cabinets can sit on top of there. So he did have to construct that first. And then [00:10:00] we got to the assembly parts. I will fully admit, that is not my wheelhouse. I am not a fan of putting together furniture. Fortunately, my husband is, and actually he roped my stepdaughter into it. It was a nice little bonding experience for them to put together all of these cabinets.
[00:10:16] Melyssa: Then you can decide at that point, are you going to paint them? Are you going to stain them? Do you have like little special knobs like that you’re going to customize any way that you’re gonna customize your cabinets probably are going to happen at that stage before you go ahead and have them installed.
[00:10:33] Melyssa: Then my husband got to installing. It was a little tricky cause the stacked cabinets and then putting them up on the pedestal. Fixing them to the wall. And then in the end, we had these little gaps. We had the little pedestal in the bottom. And then on either side, there were little gaps. And so what we did was we we had extra baseboard that we were able to put along the bottom, of the pedestal. So again, that kind of helped [00:11:00] create that look of being a built-in.
[00:11:01] Melyssa: Then we put some little molding pieces on either side. My cabinets do not go all the way to the ceiling. There’s a space above. And I did want that space open so that I could put plants and have a little bit of greenery in there.
[00:11:14] Melyssa: Once those all got installed, put together, it looked fabulous, amazing. Then I got to work putting our supplies away. For my office, a lot of the supplies, like the printer paper and the extra cartridges and the pens and binders and all of those extra things. Those all go in the lower cabinet so that I can close the door and it looks nice and neat in there. And then in the top, I did actually have some fun designing that.
[00:11:43] Melyssa: I’m not like a super knicknacky person. I’m very minimal when it comes to decorating. I actually had very little on my wall before, my husband and I got together. He was like, why does it look like bachelor walls? We don’t have anything up here. I did have [00:12:00] some fun shopping online and shopping in person and putting some things that make me happy to look at in there just to brighten up the space to bring me some joy. A lot of those things have zero function besides they just make me happy.
[00:12:13] Melyssa: That’s kind of the story of how I got my workspace, personalized, how I made it my own and how I made it, something that makes me really happy. If this gave you any ideas to personalize your workspace, please let me know. I super love the voice DMS on Instagram. I am @melyssamunday and also @mamasmakingmore. So you can contact me at either of those places.
[00:12:39] Melyssa: I will see you in the next episode.